Introduction to Vapor Tight Light Fixture
Definition and Importance
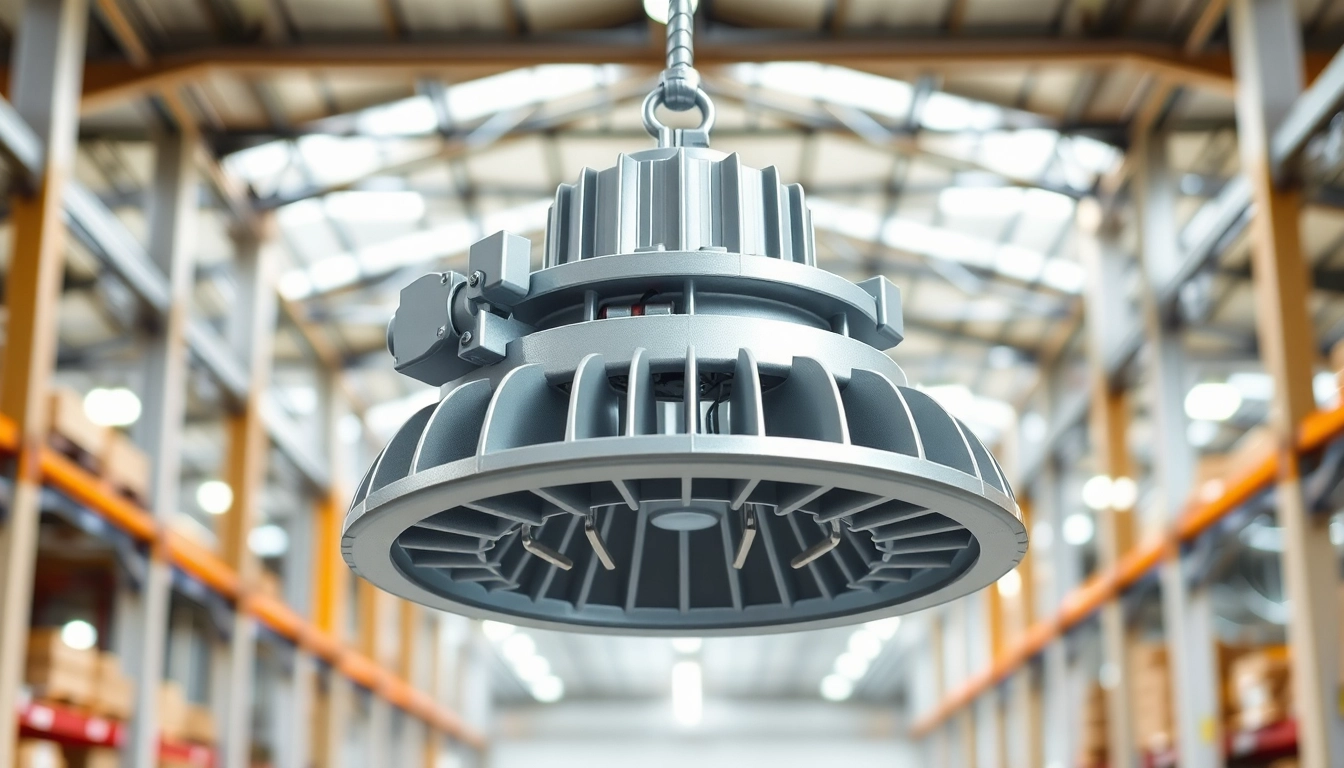
The Vapor Tight Light Fixture is a specialized lighting solution designed to withstand harsh environments, including areas with high humidity, dust, and corrosive substances. These fixtures are engineered with protective enclosures that prevent moisture and contaminants from infiltrating, ensuring reliability and longevity. The importance of vapor tight fixtures lies in their ability to provide safe and effective lighting in settings where standard fixtures may fail, enhancing both operational efficiency and safety.
Common Applications
Vapor tight light fixtures are versatile and can be employed in various environments. Common applications include:
- Industrial Facilities: Factories and warehouses often deal with moisture, dust, and chemicals where vapor tight fixtures can ensure safety and compliance.
- Outdoor Areas: Parking garages, tunnels, and building exteriors benefit from the weather-resistant properties of these fixtures, providing illumination in hazardous conditions.
- Food Processing Industries: These sectors require strict hygiene standards, making vapor tight lighting ideal for preventing contamination.
- Pharmaceutical Companies: Similar to food processing, pharmaceutical environments demand rigorous cleanliness where vapor tight fixtures aid in maintaining safe lighting.
Key Features to Consider
When selecting a vapor tight light fixture, it’s essential to consider several key features:
- Material Construction: Look for durable materials such as polycarbonate or glass that withstand impacts and corrosion.
- IP Rating: Ensure the fixture has an appropriate Ingress Protection (IP) rating, usually IP65 or higher, to guarantee its resistance to dust and water.
- Brightness and Energy Efficiency: Evaluate the lumen output and energy consumption, opting for LED options for better efficiency and lower operating costs.
- Mounting Options: Fixtures should offer versatile mounting compatibility depending on the application, whether wall, ceiling, or pendant.
Benefits of Using Vapor Tight Light Fixture
Enhanced Durability
The construction of a vapor tight light fixture is tailored to withstand harsh conditions. The use of robust materials not only ensures the fixture remains functional in extreme temperatures or wet environments but also protects it against damage from impacts or chemical exposures. This durability translates to longer fixture life spans, reducing the frequency of replacements and associated costs over time.
Energy Efficiency
Energy efficiency is a significant benefit of vapor tight fixtures, especially those utilizing LED technology. LED vapor tight lights consume significantly less power than traditional lighting methods while providing superior illumination. By reducing energy consumption, organizations can lower utility bills and contribute to sustainability goals by minimizing their overall carbon footprint.
Improved Safety Standards
Using vapor tight light fixtures can substantially improve safety in various settings. These fixtures minimize the risk of electrical failures resulting from moisture ingress, which can lead to short circuits and potential fire hazards. Furthermore, proper lighting in hazardous or dimly lit areas prevents accidents and injuries, supporting a safe working environment for employees.
Installation Process for Vapor Tight Light Fixture
Required Tools and Materials
Before starting the installation of a vapor tight light fixture, it’s crucial to gather all necessary tools and materials:
- Tools:
- Drill with bits for making holes (if mounting on walls or ceilings)
- Screwdriver set
- Cable cutters and strippers
- Voltage tester
- Level
- Materials:
- Vapor tight fixture
- Mounting hardware (included with the fixture or purchased separately)
- Electrical wire (suitable for the installation location)
- Wire nuts or connectors
- Sealant (for outdoor installations)
Step-by-Step Installation Guide
Follow this step-by-step installation guide to set up your vapor tight light fixture effectively:
- Turn Off Power: Ensure the power is completely turned off at the circuit breaker to avoid the risk of electrical shock during installation.
- Prepare the Mounting Surface: If necessary, drill holes into the ceiling or wall using a suitable bit, ensuring proper placement according to the fixture’s size and intended coverage area.
- Connect the Wiring: Connect the electrical wires according to the fixture’s instructions. Usually, this involves connecting the black (hot) wire to the black wire from the fixture, the white (neutral) wire to the white wire, and grounding appropriately.
- Secure the Fixture: Use the mounting hardware to attach the vapor tight fixture securely to the surface.
- Check Level: Use a level to ensure the fixture is straight before tightening screws completely.
- Seal If Necessary: For outdoor installations, apply sealant where the fixture meets the surface to prevent moisture ingress.
- Restore Power: Once everything is securely installed and checked, turn the power back on at the breaker and test the fixture to ensure functionality.
Common Pitfalls to Avoid
While installing vapor tight light fixtures, some common pitfalls can occur:
- Poor Sealing: Ensure all seals are tight, particularly in outdoor applications, to prevent moisture from entering.
- Neglecting Safety Precautions: Always prioritize safety. Ensure power is off and use appropriate protective gear during installation.
- Improper Placement: Make sure the fixtures are placed at appropriate heights to avoid shadows in critical areas and ensure adequate illumination.
- Failing to Test Before Securing: Always test the connection after installation but before finalizing securing the fixture, allowing for adjustments if needed.
Maintenance of Vapor Tight Light Fixture
Regular Cleaning Practices
To maintain the efficiency and longevity of vapor tight light fixtures, regular cleaning is essential. Follow these practices:
- Routine Inspection: Regularly check fixtures for signs of wear or damage, which can compromise their integrity.
- Dust and Debris Removal: Use a soft cloth or non-abrasive cleaner to wipe down the fixture, ensuring that the lens is clear of dust and debris.
- Check Seals: Inspect sealing gaskets and edges for signs of wear, replacing them as necessary to maintain moisture resistance.
Troubleshooting Common Issues
Even with proper maintenance, issues can arise. Here are some common problems and troubleshooting tips:
- Fixture Not Lighting: Check the power source, test the light socket, and ensure all wiring connections are secure.
- Flickering Lights: This may indicate a loose connection or an issue with the light source. Inspect connections and consider replacing the bulb.
- Moisture Inside Fixture: If moisture is observed inside the fixture, check for cracks or poor seals and replace or repair as necessary.
When to Replace
Knowing when to replace a vapor tight light fixture can save time and resources. Consider replacing the fixture when:
- It shows signs of extensive damage or corrosion that could compromise its effectiveness.
- The light output diminishes significantly, indicating potential failure of the LED or other components.
- Regular maintenance does not improve performance, suggesting it’s reaching the end of its service life.
Comparing Vapor Tight Light Fixture Options
Different Types Available
There are various types of vapor tight light fixtures to consider, each serving particular needs:
- LED Vapor Tight Fixtures: Known for energy efficiency and long lifespan, ideal for environments requiring durable, effective lighting.
- Fluorescent Vapor Tight Fixtures: Often less expensive than LEDs but with shorter lifespans and higher operational costs.
- HID Vapor Tight Fixtures: Suitable for extremely high ceilings, providing intense light levels but requiring more energy.
Cost Considerations
When comparing vapor tight fixtures, cost considerations go beyond the initial purchase price. Assess total cost of ownership, which includes:
- Initial Cost: The upfront purchase price of the fixture.
- Installation Costs: Consider any fees associated with professional installation if necessary.
- Operational Costs: Evaluate energy consumption over time, looking for fixtures that balance output with efficiency.
- Maintenance and Replacement Costs: Consider how often bulbs or fixtures will need to be replaced based on expected lifespan.
Long-Term Performance Metrics
Evaluating the long-term performance of a vapor tight light fixture includes tracking metrics like:
- Lumens per Watt: A measure of efficiency, indicating how much light is produced per unit of energy consumed.
- Fixture Lifespan: Generally, LED fixtures have longer lifespans, often exceeding 50,000 hours.
- Maintenance Frequency: The frequency with which maintenance is required can significantly affect operational costs.
- Improvement in Safety and Productivity: Assessing how effective lighting contributes to workplace safety and productivity can justify the investment.