Introduction to Drone Photography Editing
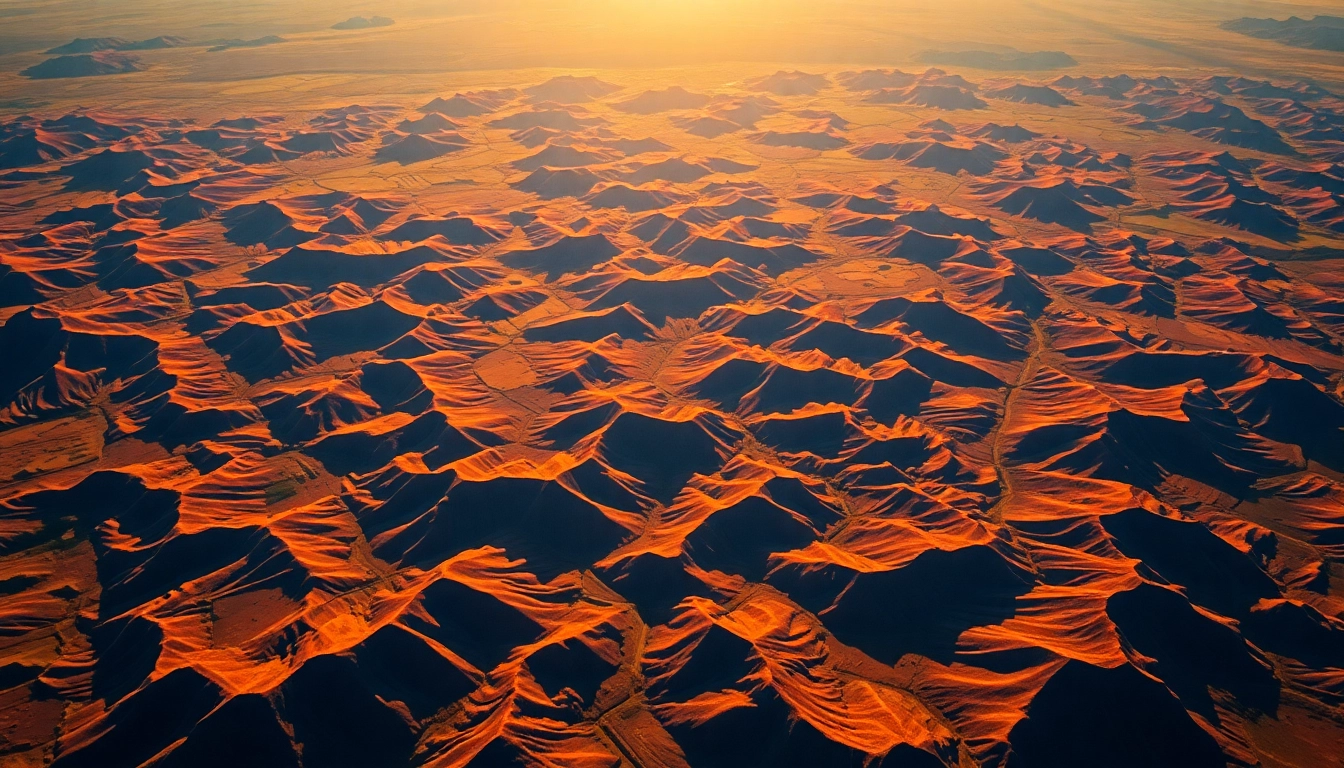
Drone photography has transformed the way we capture and experience landscapes, architecture, and events, offering unique perspectives that were once only attainable by aircraft or helicopters. However, capturing stunning aerial images is just the beginning of the creative process. The art of editing drone photography is critical to enhancing the raw shots and ensuring they resonate with viewers. In this article, we will explore the essential elements of drone photography editing, the techniques that can elevate your images, and the common challenges you may encounter along the way.
Understanding drone photography effectively requires an appreciation for both technology and artistry. A comprehensive approach encompasses not only mastering the basic drone operation but also acquiring a solid grasp of photographic principles. Pairing these with thorough editing practices will ultimately sharpen your visual storytelling skills and produce impactful aerial imagery. For those looking to refine their expertise, start delving into drone photography editing for transforming your captures into engaging works of art.
Understanding Drone Photography Basics
Before diving into editing, it’s crucial to understand what drone photography entails. Drones equipped with high-resolution cameras can capture stunning images across various ranges of altitude and distance. Knowledge of the following elements will help photographers make the most out of their drone shots:
1. Camera Settings: Familiarize yourself with manual controls such as shutter speed, aperture, and ISO. Proper settings are essential for shooting in diverse lighting conditions.
2. Flight Techniques: Learn stable flight maneuvers to minimize blur, including hovering and using smooth lateral movements.
3. Composition: Master the basics of composition (rule of thirds, leading lines, framing), which will serve as a foundation for your edits.
4. Raw Format: Aim to shoot in RAW format. RAW files contain more data than JPEGs, providing greater flexibility during the editing phase.
5. Drone Regulations: Understand local regulations regarding drone operation, including no-fly zones, altitude limits, and necessary permits to ensure both compliance and safety.
With these foundational skills in place, photographers can capture images that serve as a strong base for editing.
The Importance of Editing in Aerial Imagery
Editing is a crucial stage in fine-tuning drone photography. The processing of raw images allows photographers to express their artistic vision, correct imperfections, and enhance the overall aesthetic. Here are some pivotal reasons why editing is essential:
– Color Enhancement: Raw drone images might appear dull or muted due to lighting conditions. Editing allows for adjustments to saturation, contrast, and vibrancy, ensuring colors pop and convey the desired mood.
– Detail Refinement: Drone images can benefit from sharpening and noise reduction techniques, highlighting intricate details that might get lost during the capture.
– Artistic Style: Post-processing provides the opportunity for photographers to develop a consistent editing style that reflects their unique perspective, helping to distinguish their work from others.
– Storytelling: The right edits can elevate a photo beyond mere documentation, allowing it to tell a story or evoke emotion.
With these advantages in mind, applying effective editing practices becomes vital to a photographer’s success.
Common Editing Software for Drone Photography
Several software options cater to different editing needs, from beginner-friendly to advanced tools. Here are some of the most popular choices:
1. Adobe Lightroom: Known for its user-friendly interface, Lightroom offers a non-destructive editing workflow, making it perfect for batch processing and organizing images.
2. Adobe Photoshop: For more in-depth editing, particularly with layers and advanced manipulations, Photoshop is the go-to solution. It allows for creative composites and detailed retouching.
3. Capture One: A favorite among professional photographers, Capture One excels in raw processing and offers powerful color grading tools. Its tethering capabilities are also beneficial for studio work.
4. Affinity Photo: A budget-friendly alternative to Photoshop that offers many similar features, making it great for photographers who need robust editing without a subscription.
5. GIMP: An open-source software that provides many professional tools. While it has a steeper learning curve, it’s an excellent choice for those looking for a no-cost option.
Investing time to learn the features of these software tools can exponentially enhance the quality of your edits.
Key Techniques for Effective Drone Photography Editing
Having established the basics, it’s time to delve deeper into actionable techniques that will elevate your drone photography edits from good to exceptional.
Essential Color Correction Techniques
Color correction is one of the first steps after importing drone images into editing software. Here are the key techniques:
– White Balance Adjustment: Correcting white balance is crucial for achieving accurate colors. Use the eyedropper tool to select a neutral point in your image, or manually adjust the temperature and tint sliders.
– Curves Adjustment: Utilize the curves tool to control contrast. A gentle S-curve can enhance highlights and shadows, adding depth to your image.
– Saturation and Vibrancy: Increase saturation cautiously to avoid over-saturation, which can make colors appear unnatural. Alternatively, use the vibrance tool to enhance muted tones without affecting already vibrant colors.
– HSL Adjustments: The Hue, Saturation, and Luminance (HSL) settings allow for isolated adjustments of specific color ranges. Tweaking these sliders helps emphasize or downplay certain hues in your composition.
By meticulously applying these color correction techniques, your images can transform dramatically, bringing your vision to life.
Improving Composition and Framing
While editing cannot create elements that aren’t present in the original image, it can be used to enhance composition and framing in several useful ways:
– Cropping: Utilize cropping to eliminate distractions from the edges of the photo. It can also help to strengthen composition and focus on the subjects.
– Straightening: Ensure horizons and vertical lines are straightened. Rotate your image slightly to provide balance if it appears tilted.
– Using Guides: Implement the grid tool for symmetrical compositions and to apply the rule of thirds effectively.
– Visual Weight: Adjust the brightness or sharpness of certain areas within the image to draw the eye toward focal points.
By refining image composition in the editing phase, you can achieve clarity and focus that elevates the viewer’s experience.
Utilizing Filters to Enhance Visuals
Filters can have a profound impact on the mood and tone of your images, enabling you to create distinct styles. Here’s how to filter effectively:
– Graduated Filters: Best for landscape shots, these filters allow for selective adjustments in areas of the image. For example, darkening the sky while keeping the foreground bright can create a balanced exposure.
– Radial Filters: These can enhance parts of an image while leaving other areas unaltered. This technique is useful for drawing attention to a subject or a particular detail within the frame.
– Color Grading: Apply color filters to adjust the overall tone. Popular choices include warm or cool looks, which can significantly affect the perception of a scene.
– Creative Presets: Using or creating presets can streamline your workflow and ensure consistency across a series of images, giving a cohesive look to a project.
Incorporating filters with precision can greatly enhance the visual impact of your aerial photography.
Advanced Drone Photography Editing Techniques
Once you have mastered the essentials, consider advancing your editing skills through more sophisticated techniques.
Utilizing Layers for Professional Edits
Layers are a cornerstone of advanced editing and design. They allow for non-destructive adjustments, enabling complex edits without affecting the original image.
– Creating Layered Edits: Start by duplicating your base layer. Use separate layers for color correction, contrast enhancement, and sharpening, allowing you to adjust each effect independently.
– Masking: Employ masks to apply edits selectively. This can enhance local adjustments, such as brightening the subject while keeping the background more subdued.
– Adjustment Layers: Use adjustment layers for non-destructive editing. This means you can always revert or modify adjustments without permanently altering the pixel data.
– Smart Objects: In Photoshop, convert layers to smart objects to maintain the ability to edit them later. This is particularly useful for filters that you may want to modify after application.
Harnessing the power of layers can make your workflow more efficient and keep your edits precise.
Integrating Landscapes with HDR Techniques
High Dynamic Range (HDR) techniques can dramatically improve the detail and richness of aerial images, especially in challenging lighting scenarios.
– Bracketed Exposures: Capture a series of images at different exposure levels (underexposed, correctly exposed, and overexposed) to create a dynamic range of details.
– HDR Software: Use HDR processing software such as Photomatix or the HDR function in Lightroom/Photoshop to merge multiple exposures. These tools can intelligently combine images, balancing highlights and shadows.
– Tone Mapping: After merging, apply tone mapping to control the brightness and contrast levels effectively, ensuring the final image appears natural and not overly processed.
Utilizing HDR techniques can introduce breathtaking depth and detail, allowing photographers to achieve a level of realism that enhances their visuals.
Creating Panoramas from Drone Shots
Panoramic images can showcase vast landscapes in a single frame, an ideal application for aerial photography.
– Capturing Panoramas: Use your drone’s capabilities to capture several overlapping images across a scene. Aim for about 20-30% overlap between photos to facilitate stitching.
– Stitching Software: Utilize software like Adobe Lightroom or PTGui to stitch the images together. These tools can seamlessly combine images, minimizing distortion and ensuring a smooth transition.
– Final Touches: After stitching, carry out standard editing techniques like cropping and color correction to perfect the panorama.
Creating stunning panoramas can effectively capture the expansiveness of a scene, making your aerial imagery even more compelling.
Challenges in Drone Photography Editing
While editing offers exciting opportunities to elevate your drone photography, it also presents challenges. Here we explore some common issues and how to overcome them.
Common Pitfalls and How to Avoid Them
Avoiding the typical traps that can compromise the quality of your edits is essential:
– Overprocessing: It’s easy to get carried away with filters and adjustments. Always develop a sharp eye for subtlety; sometimes less is more.
– Inconsistent Style: Ensure a consistent editing style across your portfolio. Regulate your color palette and stylization choices to maintain a unified appearance.
– Ignoring Histograms: Always check the histogram of your images before making adjustments. This visual representation of tonal values helps determine if any areas are over or underexposed.
By becoming aware of these common pitfalls, you’ll develop a more refined editing approach and produce better results.
Tips for Reducing Noise in Images
Image noise can be particularly noticeable in drone photography since high ISO settings are often necessary in lower light conditions. Here’s how to manage it:
– Use Noise Reduction Software: Many editing software options, such as Lightroom or Photoshop, include noise reduction tools. Tackle luminance and color noise separately for better results.
– Shoot at the Lowest ISO Possible: When capturing images, prioritize lower ISO settings to reduce noise. Keep the shutter speed high enough to avoid blur while shooting.
– Exposure Compensation: Underexpose slightly if you are in a situation where noise might be a concern. This allows you to brighten in post-processing with minimal noise increase.
Engaging with noise reduction techniques allows you to maintain image integrity while enhancing clarity.
Addressing Color Banding Issues
Color banding can detract from the quality of drone images, presenting itself as abrupt transitions between colors rather than smooth gradients.
– Image Depth: Always work with images in 16-bit rather than 8-bit depth whenever possible. This provides a greater range of color information and reduces banding.
– Add Noise: A subtle amount of grain can mask banding, making transitions appear smoother. This trick can be executed easily using plugins in your editing software.
– Blurring Bands: Gentle Gaussian blur can help ease the harsh transitions resulting from banding. Apply the blur selectively to affected areas for a polished outcome.
By applying these methods, you can eliminate the distracting presence of banding, enhancing the overall visual quality of your drones’ images.
Measuring the Success of Your Drone Photography Edits
Success in editing isn’t solely based on appearance; it must also reflect engagement and viewer response. Here are effective ways to measure and analyze your edits’ success.
How to Gather Feedback and Iterate
Receiving feedback can be invaluable in honing your editing skills:
– Community Involvement: Share your images on forums, social media, and photography groups. Encourage constructive criticism to learn from others’ perspectives.
– Peer Reviews: Ask fellow photographers to review your work and provide insights. They may notice aspects you might have missed or suggest enhancements.
– Self-Evaluation: Routinely revisit your past images and edits. Assess what worked and what didn’t, gradually refining your technique.
Developing a culture of feedback can significantly facilitate your growth as an aerial photographer.
Metrics to Track Edits’ Impact on Engagement
Consider tracking these metrics to assess the effectiveness of your drone photography edits:
– Social Media Engagement: Monitor likes, shares, and comments to gauge which images resonate most with your audience.
– View Counts: On platforms like YouTube or personal portfolios, view counts can inform you about the community’s interests and preferences.
– Portfolio Development: Keep track of which images garner the most attention for your portfolio. This can inform future shooting and editing strategies, tailoring your approach based on successful outcomes.
Gathering and analyzing these metrics can guide your future edits and enhance audience engagement.
Showcasing Your Edited Work Effectively
How you present your edited drone photography can influence viewer perception and engagement:
– Select a Portfolio Platform: Use websites like 500px, Flickr, or a personal portfolio site to showcase your work professionally.
– Themed Collections: Consider curating your images around themes or projects, providing viewers with a focused visual narrative.
– High-Quality Prints: For physical showcases or galleries, ensure prints are of high quality that reflects your editing mastery, as this can create a lasting impact.
By strategically presenting your work, you foster viewer connection and potentially attract commercial opportunities.
Conclusion
Mastering drone photography editing is a multifaceted journey that requires understanding photographic principles, honing technical skills, and expressing creativity. It transforms raw aerial images into captivating, visually rich stories that resonate with viewers. As technology continues to evolve, so too will the techniques and tools available for editing. Staying informed about advancements and regularly updating your skills is vital to maintaining your edge in the aerial photography landscape.
Through careful application of color correction, composition refinement, and advanced techniques, along with an awareness of challenges and success metrics, you can elevate your drone photography to new heights, making a remarkable impression on your audience.